

A few days ago I came across this awesome superhero Interaction app design on Dribble by vijay verma and I decided to develop it in Flutter.
Here is how it actually looks on mobile.
Sometimes a thing is not as difficult as it seems to be, It applies to this app too. It is built just using multiple Flutter’s core animations APIs without the use of any library/plugin.
In this Article, I shall explain the basics that lay the foundation for the whole app. Although this app still needs more UI polishing, It’s good to get started with such awesome animations. So let’s see how it is made.
Basically, it is consist of two screens.
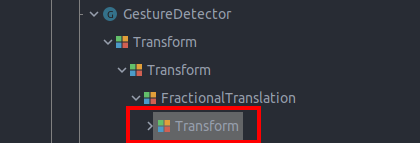
It all starts from Stack, Look at the structure here.
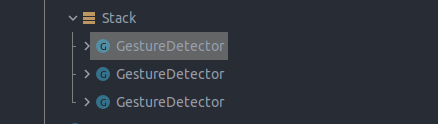
There is a total of 3 GestureDetector that are wrapped inside the stack. Each GestureDetector represents superhero card.
GestureDetector: It is used to detect swipe left on the card.
GestureDetector(
  onHorizontalDragEnd: _horizontalDragEnd,
  child: ...
);
_horizontalDragEnd is a method which is responsible to detect left swipe and do the necessary operation.
void _horizontalDragEnd(DragEndDetails details) {
  if (details.primaryVelocity < 0) {
    // Swiped Right to Left
    //Do what you want to do.
  }
}
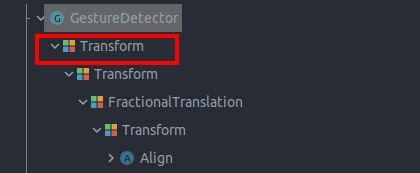
Transform.translate: Gesture detector further contains Transform.translate which is used to translate card from the current position to left.
Transform.translate(
  offset: _getFlickTransformOffset(
      characters.indexOf(character)),
  child: ...
)
_____________________________________________________
Offset _getFlickTransformOffset(int cardIndex) {
  if (cardIndex == currentIndex) {
    return _translationAnim.value;
  }
  return Offset(0.0, 0.0);
}
_getFlickTransformOffset assigns values to animate from the current position to left on the current card(card on top) and 0.0 to rest of the card because we don’t want to move other cards on swipe left.
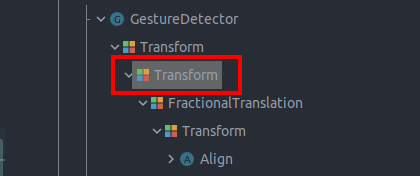
Transform.rotate: This is used to rotate card in an anti-clockwise direction. The reason for having this inside/with Transform.translate is that we don’t want a card to just get the exit in left but also rotate a little bit with that.
Transform.rotate(
  angle: _getFlickRotateOffset(
      characters.indexOf(character)),
  origin:
      Offset(0, MediaQuery.of(context).size.height),
  child: ...
)
______________________________________________________________
double _getFlickRotateOffset(int cardIndex) {
  if (cardIndex == currentIndex) {
    return -math.pi / 2 * _rotationAnim.value;
  }
  return 0.0;
}
_getFlickRotateOffset assigns values to rotate on the current card(card on top) and 0.0 to rest of the card.
One more thing to notice here is that the origin point for rotation is shifted to the height of the screen to have the effect of animation shown in the design.
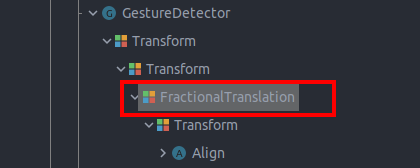
FractionalTranslation: This widget is used to move a card from the current position to bottom.
FractionalTranslation(
  translation: _getStackedCardOffset(
      characters.indexOf(character)),
  child: ...
)
___________________________________________________________________
Offset _getStackedCardOffset(int cardIndex) {
  int diff = cardIndex - currentIndex;
  if (cardIndex == currentIndex + 1) {
    return _moveAnim.value;
  } else if (diff > 0 && diff <= 2) {
    return Offset(0.0, -0.06 * diff);
  } else {
    return Offset(0.0, 0.0);
  }
}
_getStackedCardOffset assigns proper value so that it looks that cards are placed one above another. For the card placed in the second position, Animation values have been assigned so that it smoothly moves in center.
Transform.scale: This widget increases the size of the card as it moves from top to bottom.
Transform.scale(
  scale: _getStackedCardScale(
      characters.indexOf(character)),
  child: HeroCard()
)
____________________________________________________________________
double _getStackedCardScale(int cardIndex) {
  int diff = cardIndex - currentIndex;
  if (cardIndex == currentIndex) {
    return 1.0;
  } else if (cardIndex == currentIndex + 1) {
    return _scaleAnim.value;
  } else {
    return (1 - (0.123 * diff.abs()));
  }
}
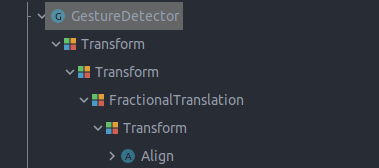
As you can see the final HeroCard is wrapped in total 4 different animations.
That’s it for UI. Take a little break here.
Also read: Creating a Text Reader Animation in Flutter
First, have a little look at the code.
AnimationController controller;
CurvedAnimation curvedAnimation;
Animation<Offset> _translationAnim;
Animation<double> _rotationAnim;
Animation<Offset> _moveAnim;
Animation<double> _scaleAnim;
____________________________________________________________
controller = AnimationController(
  vsync: this,
  duration: Duration(milliseconds: 500),
);
curvedAnimation =
    CurvedAnimation(parent: controller, curve: Curves.easeOut);

_translationAnim = Tween(begin: Offset(0.0, 0.0), end: Offset(-100.0, 0.0))
    .animate(controller)
      ..addListener(() {
        setState(() {});
      });
_rotationAnim = Tween(begin: 0.0, end: 2.0).animate(controller)
  ..addListener(() {
    setState(() {});
  });
_scaleAnim = Tween(begin: 0.9, end: 1.0).animate(curvedAnimation);
_moveAnim = Tween(begin: Offset(0.0, -0.06), end: Offset(0.0, 0.0))
    .animate(curvedAnimation);
_translationAnim moves card from the current position to -100 in left
_rotationAnim is responsible to generate values that rotate card.
_scaleAnim increases the size of the card as it moves to the center.
_moveAnim it actually moves the card to the center.
Now let’s rewind a little bit. Did you remember there is a method that detects left swipe on the card? Adding triggering code for the animation inside that method looks like
void _horizontalDragEnd(DragEndDetails details) {
  if (details.primaryVelocity < 0) {
    // Swiped Right to Left
    controller.forward().whenComplete(() {
      setState(() {
        controller.reset();
        Character character = characters.removeAt(0);
        characters.add(character);
      });
    });
  }
}
So after applying all the above techniques, you get really amazing animation stuff in your app and that’s the beauty I like about Flutter.
Think more, Do more with less code.
That’s it.
I hope you have understood the basic idea of implementing this.
Reference – Flutter Animation basics explained with Stacked Cards
Also check out my other article on Options to Animate in Flutter.